Setup
In this chapter we'll finally get some hands on experience on building simple DApp using useDApp! We'll start by setting up the template project and taking a look at the code inside it.
Prerequisites
To be able to follow this tutorial you'll need to have the following installed on your machine:
- Git
- Node.js
- It is recommended to use LTS or Maintenance version
- Yarn
- MetaMask installed in your browser
Building the project
Clone the repo:
git clone https://github.com/yivlad/useDApp-tutorial.git
Go to the repo root directory:
cd useDApp-tutorial
Install all dependencies:
yarn
And finally, build the project:
yarn build
Repo structure
The repo is a yarn workspaces monorepo. Under the packages directory you'll find a directory containing the code for the contracts and a directory containing the code for the frontend.
Contracts
Directory contracts contains a package named @simple-dapp/contracts. It contains Solidity code for WETH10 and all necessary stuff to deploy it to the local blockchain node. The package provides few commands that you may find useful:
yarn start-ganache- starts a local blockchain node on port8545.yarn deploy-local- deploys theWETH10contract to the local blockchain node. The contract address will be printed to the console. The local blockchain node should be running.yarn get-funds- you can pass in your address as a parameter and get 1 ETH on your account on the local node. The local blockchain node should be running.
Waffle is used here to compile, test and deploy the contracts. WETH10 contract type and ABI are exported from the package.
Frontend
Directory frontend contains code for our DApp. This is the package we'll make our changes to during the tutorial. It's a React app configured to use useDApp and ethers. The app depends on the package @simple-dapp/contracts and uses WETH10 contract type and ABI.
Running the project
To run the project you'll need two terminal windows open. In the first one, we'll start a local blockchain node. In the second one, we'll deploy the WETH10 contract to the local blockchain node and get some funds to be able to send transactions. After that we'll use the same terminal to start the React app.
Starting a local blockchain node
In the first terminal window, go to the packages/contracts directory and run:
yarn start-ganache
This will start a local blockchain node on port 8545. You can see logs produced by the node in the terminal window. The script yarn start-ganache uses library called ganache under the hood.
Deploying the WETH10 contract and getting funds
In the second terminal window, go to the @simple-dapp/contracts package.
cd packages/contracts
Deploy the WETH10 contract to the local blockchain node we started in the previous step.
yarn deploy-local
This will print the address of the deployed contract to the console. Copy the address and paste it into the line 5 of packages/frontend/src/shared/weth10addresses.ts file.
- [Localhost.chainId]: '0xf4BB2e28688e89fCcE3c0580D37d36A7672E8A9F' // TODO: paste the actual address here
+ [Localhost.chainId]: '0xA193E42526F1FEA8C99AF609dcEabf30C1c29fAA'
info
Note that the address you got from the previous step is probably the same as the one in the code snippet above. This is because the address of the deployed contract is computed based on the address of the deployer account, which is defined in yarn deploy-local script, and the number of transactions the account has sent before.
Getting funds on local network
In this we'll get some funds to be able to send transactions to our local blockchain node. First we need to get our address. Go to your browser and open Metamask. Copy your address.
After you've copied your address, go back to the terminal window and run (replace INSERT_YOUR_ADDRESS_HERE with the address you've copied):
yarn get-funds INSERT_YOUR_ADDRESS_HERE
Starting the React app
In the terminal window you used in the previous step, go to the packages/frontend directory and run yarn start. This will start the React app on port 8080.
cd ../frontend
yarn start
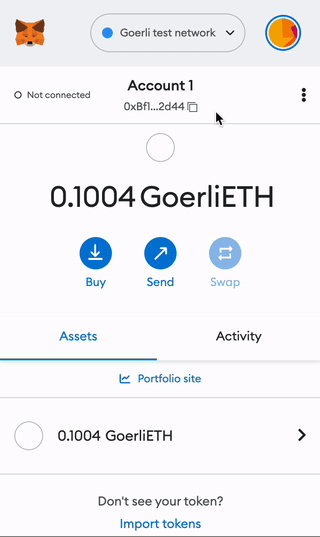
Open http://localhost:8080 in your browser. You should see the following page:
Summary
In this chapter, you made all the necessary preparations to start doing the exercises. But before starting with the exercises, we will look into configuration of our DApp.